

Flash Deck® Metal Base - Install Protocol
Product Specifications
Product Description
This product is intended for use under metal roofing systems. Flash Deck® Metal Base delivers high-heat butyl protection that metal roofs demand, but in an ultra-lightweight 5-square roll that significantly cuts crew fatigue and installation time compared to heavier competitors.
EAVE INSTALLATION
Horizontal Installation (Standard)
- Valleys First: Always install valley underlayment first, ensuring the horizontal field courses provide a minimum 4” overlap onto Flash Deck® Metal Base installed in the valley.
- Layout: Always work from the low point to high point of the roof. Lay the material out horizontally (parallel to the eave) with the printed side facing up.
- Laps: Overlap the underlying horizontal course by 4” and maintain a 10” overlap for all vertical (end) laps. Stagger all vertical laps by a minimum of 6’.
- Technique: Cut the underlayment into manageable lengths. Depending on your crew size and weather conditions, peel back a portion of the release liner, align the underlayment, and continue peeling the liner while firmly pressing the material into place.
- Rolling: Broom the field of the sheet and hand roll seams and overlaps securing the underlayment by pushing the adhesive mass into the pores of the roof deck. Always verify adhesion before moving on.
- Allowable Method (Steep Slopes): For steep slope applications (6:12 pitch or greater), you may blind-nail the overlap area if deemed necessary for added security.
Vertical Installation (6:12 pitch or greater)
- Valleys First: Always install valley underlayment first, ensuring the horizontal field courses provide a minimum 4” overlap onto Flash Deck® Metal Base installed in the valley.
- Layout: Always work from the low point to the high point of the roof. Install two courses horizontally (parallel to the eave) with printed side up.
- Laps: Overlap the underlying horizontal course by 4” and maintain a 6” overlap for all vertical (end) laps. Stagger all vertical laps by a minimum of 4”.
- Technique: Cut the underlayment into manageable lengths and if possible, cut a single length from ridge to horizontally placed product including for minimum 4” overlap. Depending on your crew size and weather conditions, peel back a portion of the release liner, align the underlayment, and continue peeling the liner while firmly pressing the material into place.
- Fastening: Nail the top of the product along the peak 3” down from the terminal point of the substrate. If deemed necessary, blind nail the product along the vertical edge of the product.
- Rolling: Broom the field of the sheet and hand roll seams and overlaps securing the underlayment by pushing the adhesive mass into the pores of the roof deck. Always verify adhesion before moving on.
Important Notice: It is recommended that the underlayment be installed from the eave up the roof to a point 36” inside the exterior wall (above the max ice dam buildup line). Consult local codes.
EAVE OPTIONS
Roofers’ Advantage Products offers three distinct methods for detailing your eaves. Always consult your local building codes to ensure compliance before beginning. Our standard method involves installing the drip edge first, followed by applying Flash Deck® Metal Base over the nail flange. For maximum protection, our two upgraded options utilize Flash Deck® Strip-In to create a completely sealed deck. Choose the approach that best fits your project:
Standard Installation
- Drip Edge: Install the drip edge along the eave first.
- Metal Base: Install Metal Base over the drip edge nail flange to the nose of the drip edge, encapsulating all fasteners.
- Roller: Use a roller to activate the pressure-sensitive adhesive bond.
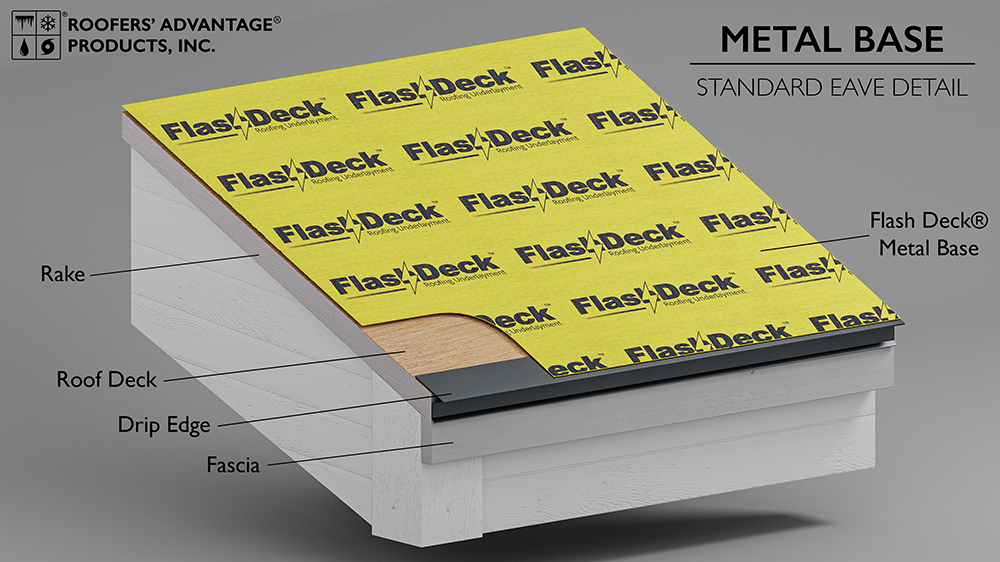
Standard Installation Detail
Enhanced
- Flash Deck® Metal Base: Install Flash Deck® Metal Base onto the fascia, ensuring it will not be visible below the drip edge once installed.
- Drip Edge: Install drip edge.
- Flash Deck® Strip-In: Install Flash Deck® Strip-In from the nose of the drip edge, extending a minimum of 4” onto the Flash Deck® Metal Base. This covers all exposed fasteners and encapsulates the drip edge nail flange.
- Roller: Use a roller to activate the pressure-sensitive adhesive bond.
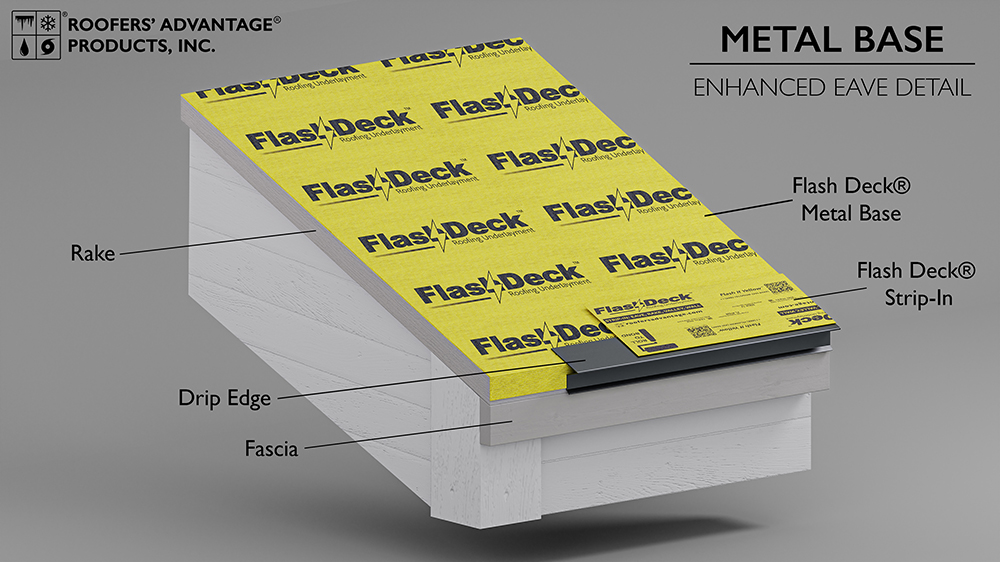
Enhanced Installation Detail
Superior
- Flash Deck® Strip-In: Install Flash Deck® Strip-In onto the deck, overlapping it onto the fascia. Ensure the Strip-In will not be visible below the drip edge once installed.
- Drip Edge: Install drip edge.
- Flash Deck® Metal Base: Install the drip edge and apply Flash Deck® Metal Base onto the top of the drip edge, covering all fasteners.
- Roller: Use a roller to activate the pressure-sensitive adhesive bond.

Superior Installation Detail
RAKE INSTALLATION
Install Flash Deck® Metal Base along the rake edge, trimming flush or extending onto the rake trims. Subsequent installation of the drip edge must occur directly on top of the Flash Deck® Metal Base. As an optional enhancement, Flash Deck® Strip-In may be applied over the drip edge nail flange to ensure all fasteners are fully encapsulated.
VALLEY INSTALLATION
General Note: For valley applications, Flash Deck® Strip-In is installed prior to the primary Flash Deck® Metal Base. This sequence builds essential redundancy at critical interfaces and provides the malleability required to conform to the irregular surfaces often found in valley details.
- Prepare and Crease: Cut the 9” wide Flash Deck® Strip-In into manageable lengths. Fold each section in half lengthwise to create a crease that conforms to the valley profile.
- Align and Place: It is recommended to work with a second person for this step. Remove as much of the release liner as possible, and center in the valley adhering one side then work towards the other valley side ensuring tight contact at valley bottom.
- Work Bottom to Top: Always install the product working from the eave up toward the ridge.
- Overlap Sections: Ensure each new section of underlayment overlaps the previous one by a minimum of 6”.
- Secure and Bond: Use a small hand roller to smooth the membrane, ensuring complete adhesion to the substrate.
- Install Primary Roofing: Once all valley joints and seams are securely covered, proceed with the application of Flash Deck® Metal Base centered in the valley.
Important Note: Flash Deck® Strip-In is not a complete standalone underlayment. It must always be covered by a primary self-adhered Flash Deck® roofing underlayment.
WALL INSTALLATION
General Note: For wall applications, Flash Deck® Strip-In is installed as an integral part of the finished roofing system. It fully encapsulates the vertical leg of all standard metal wall flashings—including step, continuous, and headwall flashings. By securing this critical interface, Flash Deck® Strip-In provides essential protection in an area that is a common source of roof and siding failures.
- Base Installation: Install the Flash Deck® Metal Base up the vertical wall as required by local building codes.
- Install Flashings: Complete the roofing system, including vertical wall flashings.
- Alignment Guide: Snap a chalk line onto the wall flashing to ensure Flash Deck® Strip-In will remain hidden once the final siding is installed.
- Keep It Straight: With a partner, install the Flash Deck® Strip-In onto the vertical leg along the chalk line.
- Roll to Bond: Roll Flash Deck® Strip-In firmly onto the wall and flashing to ensure a watertight seal.